Make Your Own Backyard Listening Station
Humans have long questioned whether or not the Earth is home to the only intelligent life in the universe. As technology has advanced, more people have become interested in searching for extraterrestrial intelligence, creating a field known as “SETI.” SETI is an acronym that stands for the “Search for Extra-Terrestrial Intelligence,” and professional astronomers and backyard amateurs alike contribute to the search in a variety of ways.
When it comes to contributing to SETI, there are many different avenues interested individuals can pursue. The easiest way to contribute would be to download the search software from SETI@Home, but some people prefer to truly get their hands dirty and delve completely into the world of amateur SETI setups. It is possible to receive, convert and analyze signals from your own backyard by deploying an amateur setup.

To conduct your own search, you need to first construct a listening station. While an amateur SETI station will vary, there are a few components that will remain common. Basically, the components needed are:
- A Dish
- A Receiver
- A PC to analyze results on.
The homemade station will work by having a dish serve as a collection point for signals and then passing raw signals to a receiver which will pick out the specific signal ranges of interest and pass them on to a PC which will analyze the signals using specialized analytical software.
Although some technical knowledge is required for setting up a home listening station, the range of knowledge involved ranges from novice to expert, depending on how advanced of a listening station is desired. The range of technology used will vary according to skill and budget, with price playing a major role for many amateurs.
Novice technicians can build basic setups that will provide signals to analyze, while expert technicians can build advanced setups which can automatically scan areas of the sky and provide detailed analysis and information about areas scanned and signals recorded. More complex setups will require more significant investments into both time and equipment.
1. The Dish
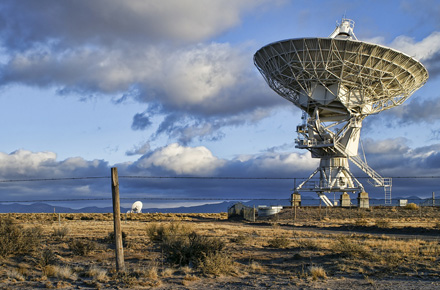
A parabolic reflector, or satellite dish, is needed to collect signals from space. A typical television satellite dish will actually provide reasonably good reception for the purposes of a SETI station. A typical television dish will capture microwave signals in the 1-10GHz range, making this reasonable for SETI purposes.
However, the smaller 1.4-1.7 GHz range is greatly preferred and a dish that is 7 to 12 feet in diameter is ideal for detecting signals in this specific range. Generally, the newer smaller dishes will not meet these specs. In this case, older and bigger dishes would be ideal for collecting signals.
The larger dishes are commonly known as “big ugly dishes.” These older dishes that are ideal for SETI use were originally designed for c-band television reception. From the late 70’s to the early 90’s these large dishes were often the only method of television reception available to residents of rural or mountainous areas. In the days before encrypted satellite signals, like those used by DirectTV, a large dish would enable residents to pick up a wide variety of channels for free and resulted in these unsightly dishes becoming very popular. As encryption became widely used these large dishes fell out of common use. Due to the requirements for encryption equipment needing to be directly attached to the television and the invention of smaller, less cumbersome dishes that would detect these signals people began abandoning the large dishes and switching to the smaller models provided by the satellite company.
Many of the large dishes were simply disconnected and simply left in place as they were replaced by the smaller models. The large size of these dishes makes them stand out as an eyesore and makes removing the dishes and disposing of them quite a chore. For amateur SETI enthusiasts, this is very good news. These two factors combine to make the older satellites very affordable, and even free in some cases. Often, a SETI amateur can offer to remove and haul away an old dish in lieu of actually paying cash for one, and homeowners are happy to get the dishes off of their property.

When dealing with an amateur SETI setup, the dishes will often be referred to as “antennas” instead of satellite or parabolic dishes. To keep things simple, this guide will refer to them simply as dishes.
2. Mounting the Dish
Once acquired, the next step is mounting the dish with hardware. The good news is that there is only really one wrong way to point a satellite dish, and that would be down at the ground. As long as the dish is aimed at the sky, it’s aimed in the correct direction. With this in mind, the simplest mount is just putting the dish on the ground facing the sky, like a giant birdbath and securing it into place. For a beginning amateur securing the dish on the ground is enough to get started. Further down the road, more advanced mounts can be installed and deployed if desired.
More advanced mounts can employ motors that are able to mechanically and precisely position the dish to receive signals from specific areas in the sky. These motorized mounts can be costly and time-consuming to deploy, so most amateurs opt to statically position the dishes instead.
3. Collecting the Signals
With the dish in place, the signals it collects then need to be funneled towards the receiver. This is usually done with a device called a feed horn. For many amateur SETI users, the feed horn is simply a metal pipe that is closed on one end. The closed end is the end farthest from the dish and contains a small probe which connects to coaxial wire. The feed horn funnels the signals to this probe, which then sends the signals to the receiver via the wire.
4. Amplifying the Signals
The next stop after the probe is often a Low Noise Amplifier or LNA. This device takes a weak signal and magnifies it. There are commercially available LNAs that will easily connect to the coaxial wires used in the dish set up. Most SETI Amateurs find a “Type N” LNA most convenient, due to the fact that it easily connects to most feed horns and receivers without modification. The LNA should be connected directly to the output on the feed horn so that it can most effectively amplify gathered signals.
Some amateurs also add in a line amplifier after the LNA, but this is completely optional. Adding too much amplification can cause the receiver to pick up GPS satellite responses or other unwanted signals, so line amplifiers should be used with care.
5. Connecting the Dish to the Receiver
Usually, a SETI dish is located outdoors and the receiver and PC are located indoors, some distance away from each other. The connection between the dish and the receiver is typically made via coaxial cable, with low-loss cabling being the best choice possible. With coax cable, the greater the length of the cable, the more signal loss will occur on the way to the receiver.
Simply put, use the shortest cable possible with the best shielding possible. A shorter cable with good shielding provides the best method for connecting the devices with the least amount of data loss. Also, try to position the dish and receiving station as closely together as possible to minimize signal loss due to wire length.
The Microwave Receiver
The cable from the dish then needs to connect to a device that can receive the desired signals. When it comes to microwave receivers, there are many different options to choose from, in many different price ranges.
The most expensive devices are high-end specialized microwave scanning receivers and modified radio telescopes. The least expensive options are computer-controlled receivers and down converters.
High-End Microwave Receivers
If there is a budget to be burned, the receiver component of this setup can burn it with ease. The price range for high-end receivers starts at about $2000 and goes up from there. These receivers have all the bells and whistles that could ever be desired and then some. They will scan from obscenely low ranges in the kHz range all the way up to 2 GHz, which is actually a bit of overkill for a SETI station. They can be programed to scan smaller, specific ranges in the spectrum and can also receive other signals such as CB, SSB, AM and FM. Sometimes these devices can even pick up video and digital signals as well.
Modified Radio-Telescope Receivers
A modified radio-telescope receiver can be a bit cheaper than a high-end receiver and offer optimal results for a SETI search. Basically, these telescopes are the same devices used by the professionals who are scanning the skies for “business” reasons. With some modifications, these devices can be used to scan for SETI purposes.
However, a bit of technical expertise is needed to make the modifications, so this may not be a viable option for many amateurs. For those with technical knowledge, time and a good budget, a radio-telescope can be modified to specifically aid in a SETI search and serve as an excellent tool.
Computer-Controlled Receivers
A computer-controlled receiver comes in the form of a card that plugs into a slot on a PC’s motherboard. The coax cable then plugs directly into this card and all of the receiver options are controlled via software on the PC.
While this offers convenience, it’s important to note that the close proximity of the card to computer components that are not shielded can add noise and interference to the signal. Also, it can be difficult to find the correct components for a computer-controlled setup.
Down Converters
A down converter will translate microwave signals so that practically any radio receiver can then make sense of the signals. Down converters are cheaper than the other options and work with a wide range of traditional receivers. Down converters are widely available and very reasonably priced for an amateur setup, making it often the best choice possible.
6. Analyzing the Signals
With the signals captured and converted it is then time to analyze the findings. At this point, the converter is connected to a PC and the signals are analyzed using software installed on the PC. There are many different programs available for use ranging from open source free programs to those that request a donation for use. The software will look at the gathered signals and try to scope out any signals that may be of interest. If interesting signals are found, they can then be further analyzed.
A good list of software programs can be found at: Seti League.
While the specifics of a particular amateur setup can vary greatly, these basic components will remain fairly constant. A listening station needs to serve three purposes for SETI. It needs to collect, receive and then analyze signals. There are a wide variety of ways to accomplish any of these purposes, and home SETI stations can be extremely versatile and personalized. With a minimal budget, time and a bit of technical know-how, anyone can search for extraterrestrial signals in their own backyard.
Station Setup Examples and Diagrams:
http://www.seti.net/SETINet/Operation/Operation.htm
http://www.setileague.org/hardware/blkdiag.htm
http://www.bambi.net/